
In rapid prototyping industry, vacuum casting is a low-cost but reliable and fast process for making a small volume of prototypes based on a master model. This method is ideal for you to do engineering testing, display demos or even market testing.
Here I would like to share this technology in details with you.
Vacuum casting is not a complicated technology at all, however, much details must be concerned if you want to generate a perfect component. Therefore, I would like to present some key points of this technic along with the whole process.
1 The Inspection of Master Model
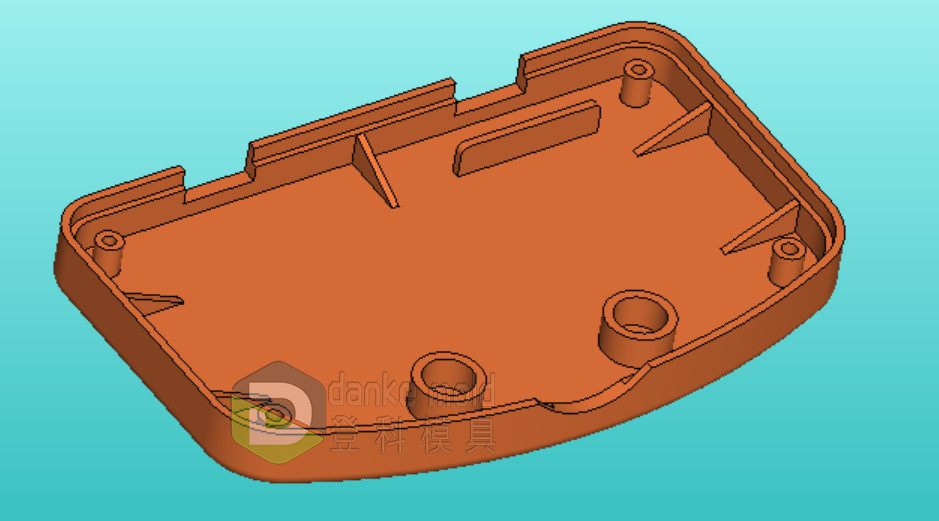
The quality of master model is the precondition of the casting part. Firstly, check the master model whether is matched the 3D drawing. And then observe surface to confirm whether the texture is matched the requirement on the production sheet. The transparent or high gloss parts need going through to check if it there are scratches or blur marks. Finally, measure the part with caliper compared with the drawing, but we must be careful not to damage the master model when measuring it.
2 Box Construction
(1) Parting Surface Confirmation
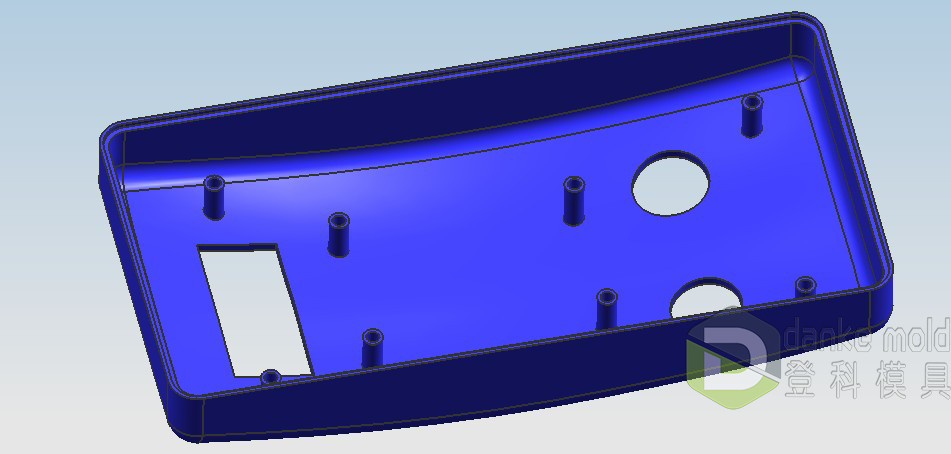
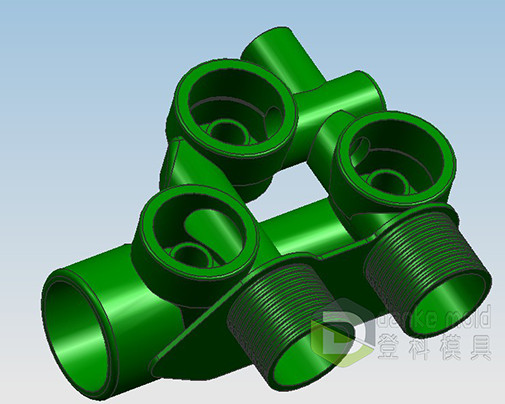
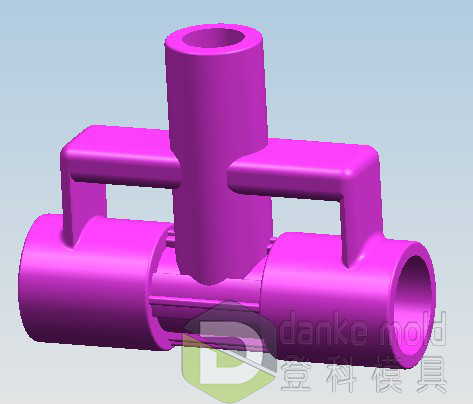
There are three rules of judging the parting surface, which are visual & invisible surfaces, assembly & non-assembly surfaces and easy & difficult to demold. Of course, there are also some more factors that should be considered, for instance, the impact on controlling the bubbles, the size of the silicone mold, the usage amount of silicone, the shape of casting part and the condition for the resin running, and etc. Please refer to the two parts below, they are the typical parts which are difficult to set up the parting lines.
(2) Parting Line Setting
Setting parting line here means taping the edge of the parting surface of the part so that the it’s easy to split the silicone mold. To reduce the influence of the tape to the casting part, the tangency width of tape and the part should be less than 2 mm, but it can be too small, otherwise it will be not strong enough. For the parts with through holes, some small gaps on the closing tape are set to let the bubbles in the liquid silicone go out when we pour silicone into the box and vacuum it. Certainly, not all the parts need to tapping, especially for the complicated parts. But how to split the mold must be considered clearly. For the transparent and high gloss parts, it’s better not to tape it if possible because it will leave a mark on the casting part.
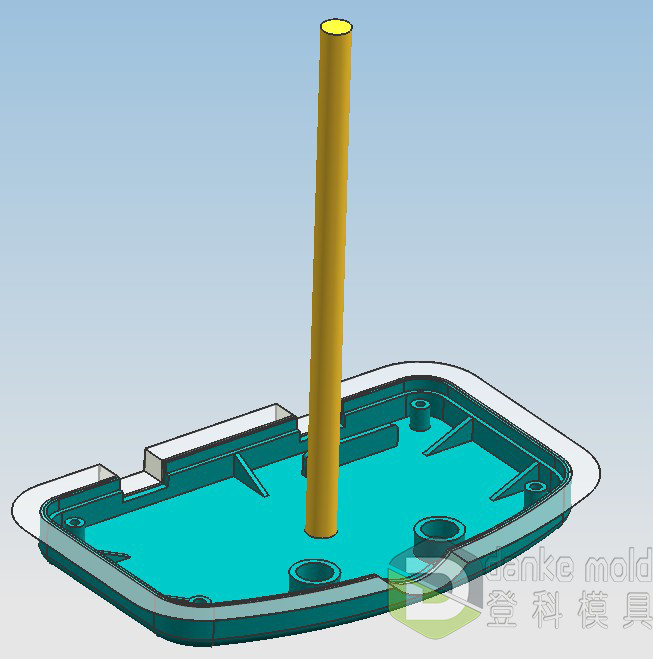
(3) Sprue Location Setting
This step is also important to the final casting part. Normally, the sprue rod will be set on the invisible surface of the component. It means the sprue mark is not seen after assembling the whole model, such as the inside of bottle lid, the bottom of cup and so on. For some simple construction or symmetrical part, the sprue rod should be set in the center as possible so that the liquid resin runs equally in the mold when casting, and the bubbles can be easily controlled. Meanwhile, some else factors should be taken into account, for instance, the surface treatment of casting part, the appearance and assembly, the mold construction, and etc. For some very small or thin components, the sprue rod should be set on the edge or lateral face. In addition, the sprue rod takes the responsibility of holding the master model in the box as well, so it must be stuck to master model steadily.
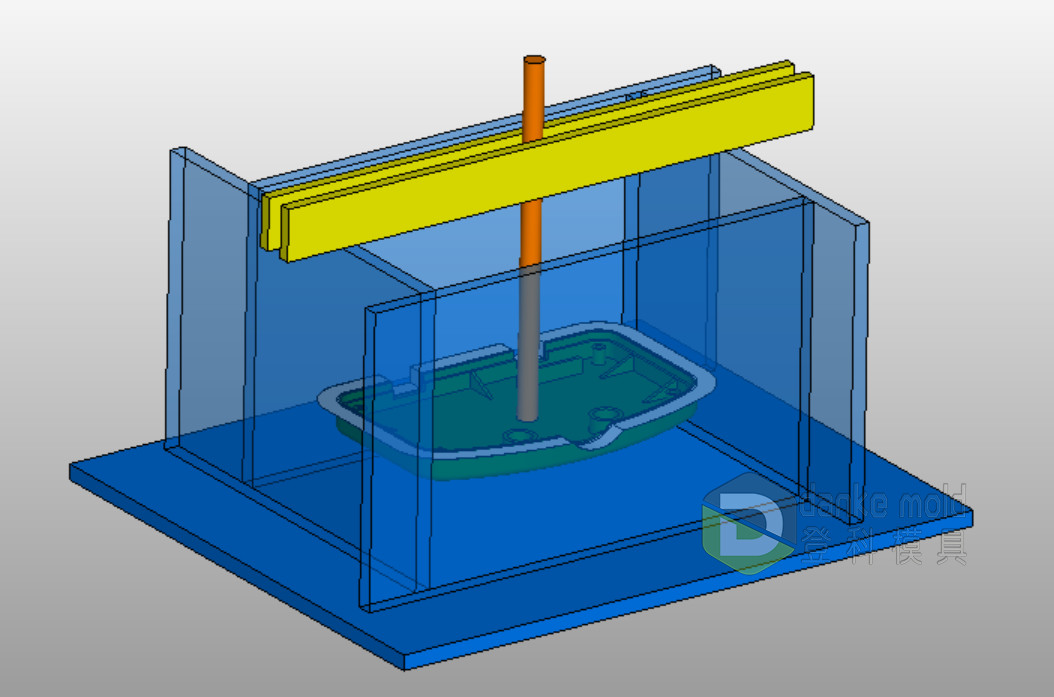
(4) Build Up the Mold Structure
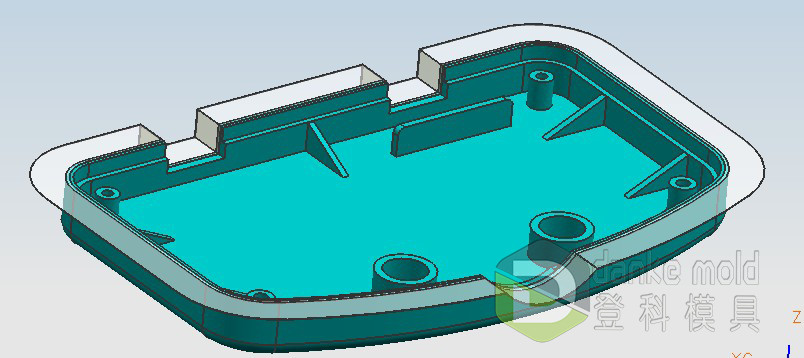
Make a box by wood board or aluminum plate according to the size of the master model. And then hang the master model which has been taped and stuck with sprue rod in the box and make it steadily. It cannot be loose and touched to the master model. The distance between the edge of master model and the inner wall of the box is 25 mm usually.
After fixing up all the things, check the structure to see if it is steady or misses something. And then put the box in a flat and safe place which is good to pour liquid silicone into the box.
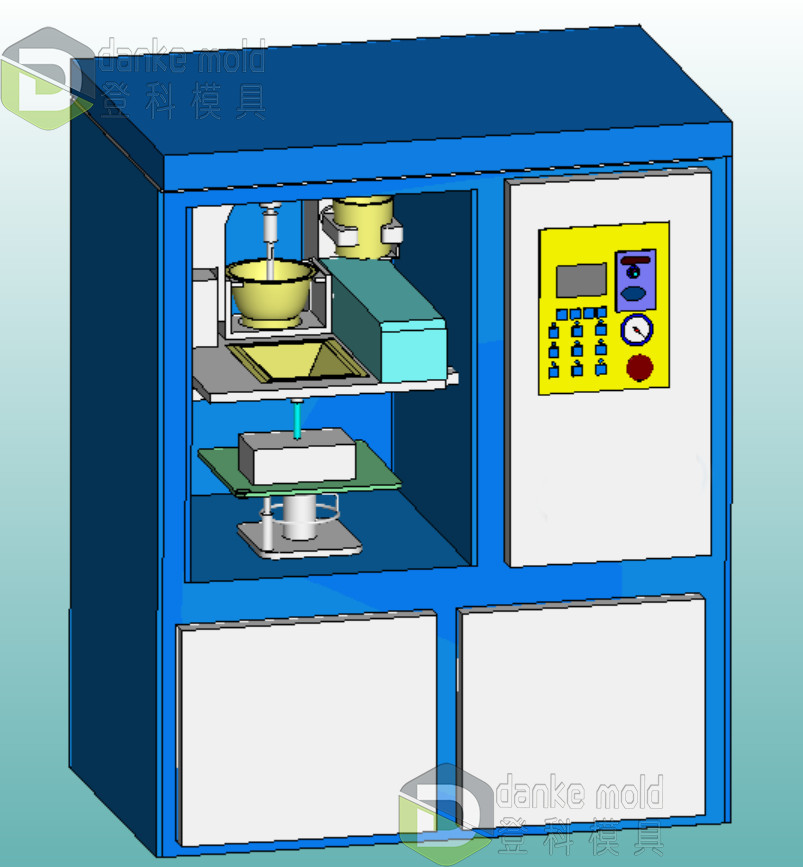
3 Pour Silicone
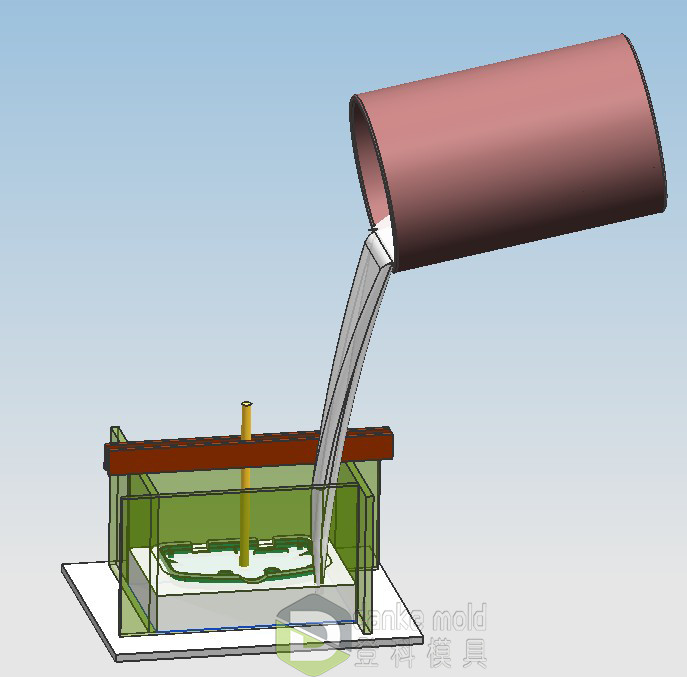
Calculate the weight of silicone and pour the silicone into a bucket. And then add the catalyst according to certain ratio into the silicone. Put the bucket in the vacuum mix machine to mix the liquid silicone and the catalyst under vacuum condition. If the weight of silicone is small, for example below 1.8kg, we can use the vacuum casting machine to do the mixing job, but the mixing must be surely sufficient, otherwise, the mold will be partly curing incompletely.
After mixing, pour the liquid silicone slowly into the box where the master model is. Keep the eyes always on the pouring, do not let the silicone fall on the master model before it lifts up to touch the bottom surface of the master model, because it may break the mold structure. Afterwards, move the box into the vacuum machine and vacuum it. This process is to suck the bubbles out of the silicone. It is especially important for the master model that has large area without through holes or has deep concave on the visual surface.
After finishing the vacuuming, move the box into the oven and cure it under 40 centigrade degree. Normally, it only spends 7~8 hours in finishing the curing, but for some master model in large size, or with very small holes or gaps, it takes about 12 hours to cure it, which makes the mold solidified enough.
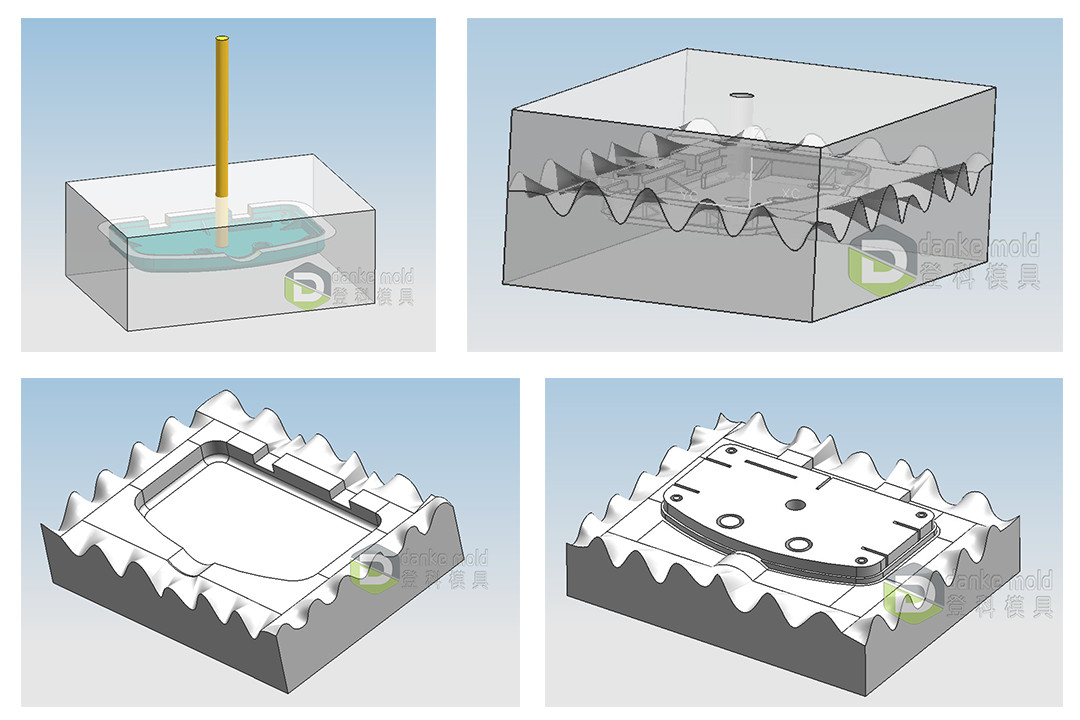
4 Split the Mold
Take the cured mold out, and prune it, and then use a knife to split the mold along with the tape connected to the part. If there’s no tape, split it according to the presupposed parting line skillfully. Normally, the parting surface from outside wall to the edge of the tape should be like a wave, so as to prevent the deflection when assembling the mold. After finishing the split job, get rid of the tapes, and take the mater master model out. Sometimes, some air vents should be made if it’s necessary, which can reduce the bubbles when casting. In the end, put the mold into the oven and preheat it under 70 centigrade degree.
5 Vacuum Casting
Take the preheated mold out of the oven, and clean it up with air gun, and then spray some release agent on it if it’s necessary. Usually, if the resin ready to be cast just slightly erodes the silicone mold, or the structure of the part is simple and easy to de-mold, it’s not necessary to spray it or spray less release agent on the mold. On the contrary, release agent is required, but not too much. Otherwise, release agent will stick on the casting part, and it’s difficult to clean it. Moreover, do not spray it on the mold which is casted for high gloss part.
Afterwards, assemble the mold, and weight the resin, and then vacuum them in the vacuum casting machine for 5 to 10 minutes. Operate the machine to let the two components of resin mix together for about 1 minute, and then cast it into the mold. Exhaust after the resin fills the mold cavity fully. The timing and rhythm of degassing has critical relation with the generation and fading of the bubbles. In the end, put the casted mold into the oven to solidify the resin under 70 centigrade degree.
6 Solidify Forming
The curing time for different material is not the same, normally between 40~90 minutes. After curing, take the mold out, and open it to get the casting part, and then clean up the fragment and the gate. The finished casting part comes out finally.
The available material for vacuum casting process is Simulant ABS, PP, PA, POM, Acrylic, rubber, and etc.