
Design Aids
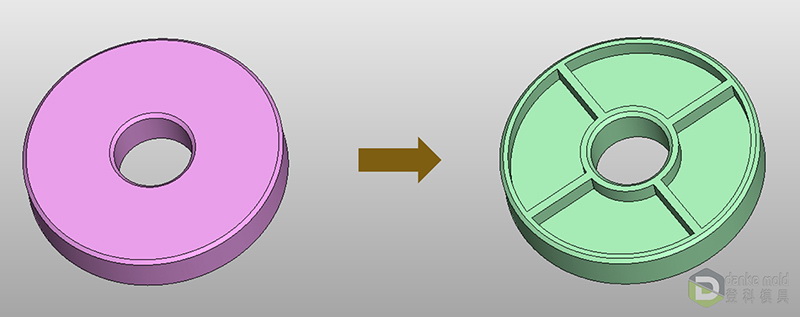
Material Cored Out
Shrinkage marks easily happen in plastic injection molding, especially for the thick-wall parts or parts with uneven wall thickness.
Reasons:
It’s because of the uneven cooling across the part wall.
Part cooling is a function of heat transfer to the mold for all thermoplastics. Most thermoplastics materials are thermal insulators. Therefore, thicker sections will require a longer cooling cycle which will result in higher piece-part cost.
Where section thickness varies, areas within a thermoplastic molded part will solidify at different rates. The varying rates will cause irregular shrinkage, sink mark, bulges in structural foam, internal stresses, and warpage. For these reasons, uniform section thickness is important and may be maintained by adding ribs or coring out material.
What it will cause:
Uneven shrinkage at the surface;
Porosity inside of the part;
Internal stresses.
Longer molding cycle time;
Narrow the molding production window and higher scrap;
So we would suggest:
Core out some material, and keep the part wall as even as possible.
Below are some rough ideas for your reference.

What it will help after the change:
Moldable for extremely thick part;
Reduce the molding cycle time;
Reduce scrap;
Save material;
Better part price;
Undercuts Simplified
Undercuts normally would need side actions, such as slider, lifter, manual inserts, rotation inserts for injection molded part to de-mold.
But some undercuts could be simplified with shut off tooling structure, without affecting the function and the cosmetic.
It’s especially useful for hinge, which may need sliders with long side action.
Following would be some rough ideas kindly for reference:
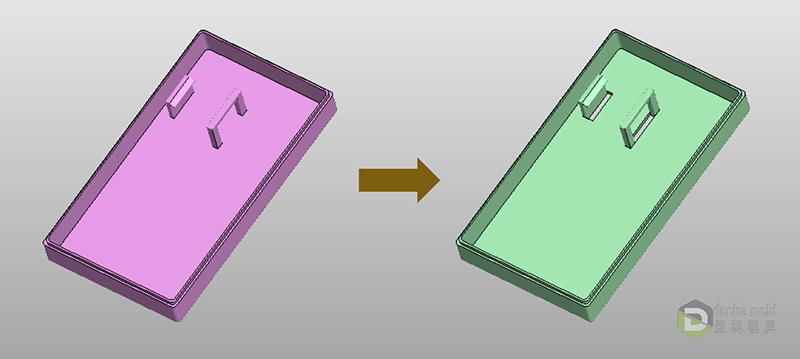
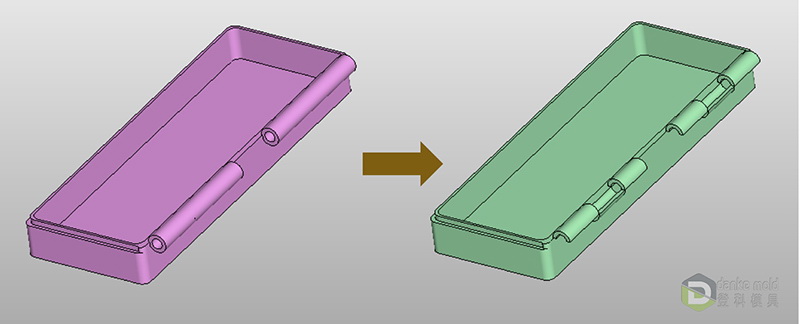
After adjustment:
Eliminate slider or lifter to simplify tooling structure.
Smaller tooling size could fit smaller injection molding machines.
Save the tooling cost.
Save the molding cost.
Drafts
Draft or taper is required, particularly for “deep draw” moldings, to permit easy removal of the part from the mold. The degree of the taper will vary according to the molding process, wall thickness, and the particular plastic molding compound. It is usually desirable to design an item with as much draft as possible.
Rules-of-Thumb, for draft:
- Use at least 1 degree on all “vertical” faces.
- 2 degrees works very well in most situations.
- 3 degrees is a minimum for a shutoff (metal sliding on metal).
- 3 degrees is required for light and medium texture.
Below are some rough ideas for your reference below.
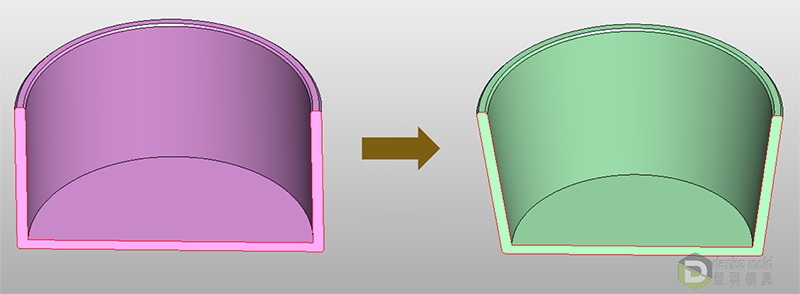
Benefits after the change:
Increase the tooling strength.
Improve the part surface quality.
Easier to de-mold.