
There are several technologies available for the manufacturing of prototype plastic parts. These Rapid Prototyping Technologies are attractive since they link CAD part geometries directly with the prototype part production equipment to achieve on-demand manufacturing.
The rapid prototyping techniques can produce prototype plastic parts or models in several hours. These processes use a variety of different technologies for part production, however, each of these processes have something in common:
1) Defining the part geometry on a CAD system (solid model)
2) Slicing the geometric model into discrete 2D slices
3) Production of a physical 3D model of product, layer by layer.
These prototyping methods can bring an extremely complex design to life as a conceptual facsimile prototype in a relatively short period of time. The rapid prototyping technologies eliminate the potential for mistake by the CNC machine operator, and eliminate the tool selection/set-up planning, and the fixturing steps necessary in manual or CNC machining operations. Models can be produced in several hours, providing a valuable communication link for concurrent product engineering. The rapid prototype models can also be used as the pattern for other plastic part prototyping techniques that may be used to provide larger volume production of plastic parts.
The first commercial Desktop Plastics Prototyping System links CAD design information with a photopolymerization process to produce prototype plastic parts.is Stereo Lithography , which is by the system manufacturer is capable of producing complicated prototype parts at rapid turnaround times.
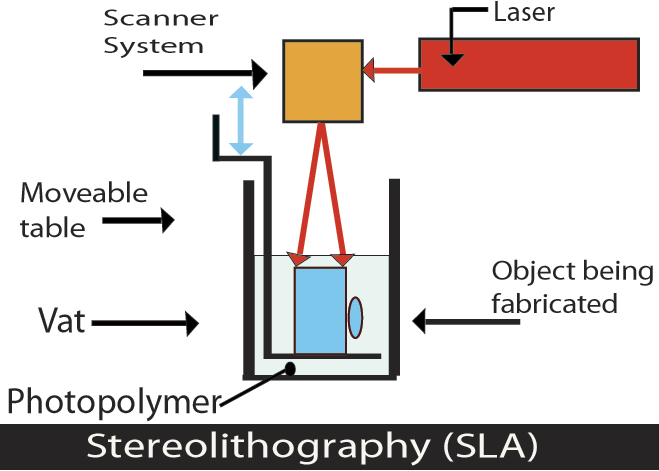
This rapid prototyping process begins by taking a CAD model,and slicing the model into layers having thicknesses in the 0.013–0.51mm range. These layers will ultimately be fabricated one at a time, starting from the bottom, to produce a solid, three dimensional prototype part. While the capital costs associated with this technique are relatively high (greater than the cost of CNC machining equipment), the process is capable of producing extremely complex, medium size parts in a fraction of the time required for the production of conventional prototype parts via conventional CNC machining, since set-up operations are eliminated.
A variety of photocurable liquids are available for use with the process. Once cured, the polymeric parts can have properties that range from brittle and glassy, to ductile, or even rubbery. The degree of polymerization is determined by variables such as the total amount of light energy absorbed by the photocurable liquid. Once the curing of a layer is complete, the elevator drops, the surface is leveled, and the process repeats itself. To prevent overshooting of the laser into the lower, previously scanned layers, the light must not be allowed to penetrate beyond a certain depth. This is accomplished by controlling the laser process conditions.、
The elevator continues to descend, layer by layer, until the uppermost layer of the part has been formed, at which time the elevator rises to the top of the bath and the part (or group of parts) is removed, drained and cleaned of surface liquids via blotting, alcohol or solvent rinse, or ultrasonic cleaning. Drains can be incorporated into the part to facilitate movement through the bath during the build. After removal from the bath, the part is described as being in the green” state (like any partially cured material) and must be handled carefully. The green part is then placed on a rotary table inside a high intensity U.V. light post-curing apparatus for a short period of time to complete the cure. The very earliest materials developed for use with the SLA process tended to be higher shrinkage, brittle materials, but newer, low shrinkage, more ductile, or even rubbery materials grades have become available.
The initial part CAD model is usually modified to provide an assisting support structure for the part as it is being produced (or built”) to ensure layer registration and structural integrity. Support structures are required when the part cross section contains islands of unsupported material. These legs or thin vertical strips are carefully removed as part of the finishing operation.
key step in the process is the initial part orientation decision. The primary appearance side of the part is often placed on top. The tolerances associated with the process vary and depend upon the CAD model, and the build parameters used. The incremental nature of this process also produces layered, step-like vertical walls for drafted or sculptured surfaces.
Smaller elevation increments improve the surface for drafted, rounded and sculptured surfaces, although this does increase build time. Flat or perpendicular surfaces minimize layer roughness compared to drafted or contoured surfaces.
Cured parts require removal of the support structure and surface finishing by hand sanding, bead blasting, or machining. Depending on the part size and complexity, the cured parts can have tolerances that approach those attainable by machining while tighter tolerances can be obtained with additional machining after cure. Machining, however, is an operation that may require fixturing, and to a large degree, defeats the purpose of the rapid prototyping technology. The finished parts can then be painted, dyed, or decorated to produce the desired effect。
Main advantages of SLA process:
1) Create complicated plastic parts easily, rapidly and precisely, for one to several pieces, or even low-volume production.
2) Fast implementation of prototypes in early stages of product development
3) Make parts complete without any sectioning/split which is common when CNC machining a complex part.
Some limitations:
1) SLA parts are generally brittle and not suitable for functional prototypes.
2) Support structures can limit design freedom
3) Not too many kinds of material available.
For more information, please click https://www.dankemold.com/.