In plastic injection molding project manufacturing processes, after CNC machining, EDM/Wire cutting, surface polishing, mold assembly would be the last but not least key procedure that affects the injection mold quality.
We hereby would like to present the assembly and disassembly procedure of a plastic injection mold, so as to show you how we work with it.
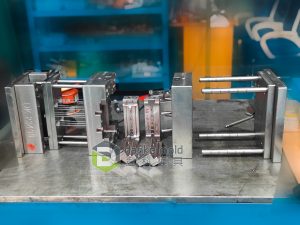
Plastic Injection mold assembly:
- Put all the mold plates, inserts, and components on the work platform/table, Have a clean table and two rails to slide plates on. It should include wrenches, aluminum prybars, copper/aluminum mallets. And these tools must be used in good condition.
- Clean all plates, inserts, and components with mild solvent and clean towels and make sure they are free from grit, debris, and chips. Then wipe everything again with a cloth, bare hand to remove small grit (Be careful that, don’t damage sharp edges, shutoffs, or the cavity finish)
- Install all core inserts, cavity inserts, gate inserts, core pins, etc. into the primary inserts. Check that all these components are marked and installed in the correct location and position.
- Mount the B-Plate to the Support Plate.
- Install the B-Half insert sets and other B-plate components. Check that all these components are marked and installed in the correct location and position.
- Grease all ejector pins, ejector sleeves through the pin retainer plate, support plate, and core inserts. Install all return pins and springs. Bolt on the Ejector plate.
- Set the ejector housing, with support pillars, guided ejection pins, etc. Guide this assembly through the ejector & other plates and bolt it to the support plate. Insert any core pins that mount in the bottom clamp plate and fasten their backup plates.
- Make sure that the Slides are greased and moves freely, and the slide retainer should be functioning properly.
- Check if all pins, sleeves, lift cores and all other moving components spin freely. Make sure all components move freely. Check that ejector plate can use the full length of travel. Check if runner & part will clear the core when ejected.
- Mount the A-Plate to the top clamp plate, Install A-Half insert set, heel blocks, angle pins, and any other A-plate components. Check that all these components are marked and installed in the correct location and position.
- Install the locating ring & sprue bushing, check that sprue radius, and check if they are the correct size and verify that the sprue bushing is rotation locked and retained.
- Verify that the mold has a mold strap and that it is fastened correctly
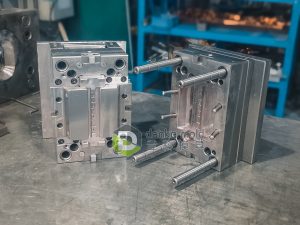
Plastic Injection mold disassembly:
- Open the mold at parting line carefully and check if there’s any damaged marks. Check if the core and cavity is rust or not. If there’s, mark it and report.
- Make sure there are enough space for putting all the components of the mold. Get some containers for them and make labels with job numbers.
- Remove the core pins and all necessary screws from Ejector housing.
- Check if all the pins, lifts and sliders are marked. Protect them carefully
- Remove all the pins and parts from Ejector Housing. Protect them carefully
- Remove all water line jiffy-plugs, all slides assemblies, the Sprue bushing, hot sprue, or any hot runner system, and protect them carefully.
- Take out all screws from cavity and core inserts and install two or four longer screws in cavity and core. Then knock out cavity and core inserts from mold base by hitting screws with aluminum mallet.
- After the primary inserts are removed, take out all sub-inserts, gate inserts, core pins, etc. and protect them carefully or put them in container.
- Clean all these components with mild solvent and cloth carefully. Store all inserts in a way that protecting the molding surfaces and make sure they are not accidentally damaged